Save
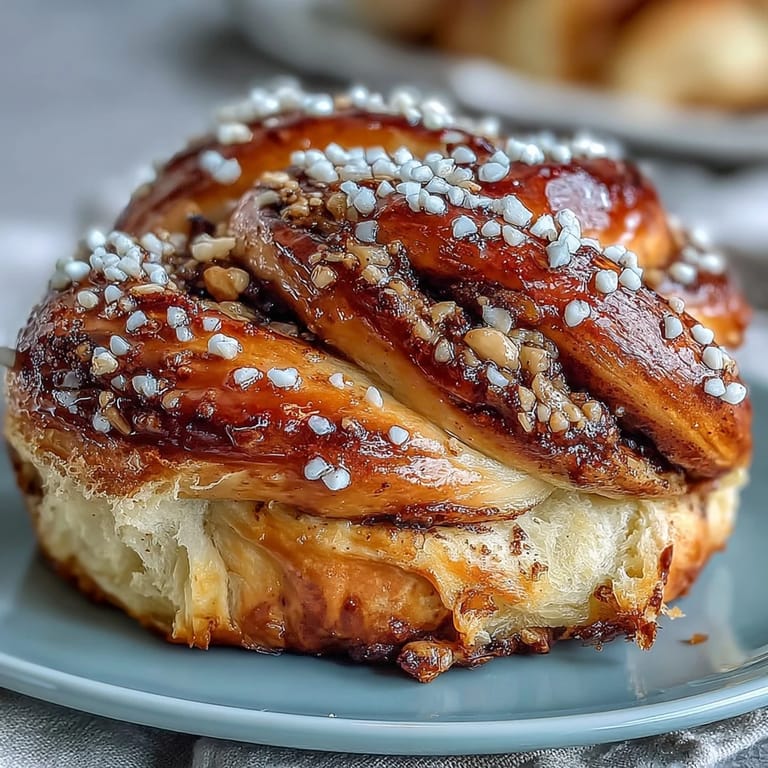
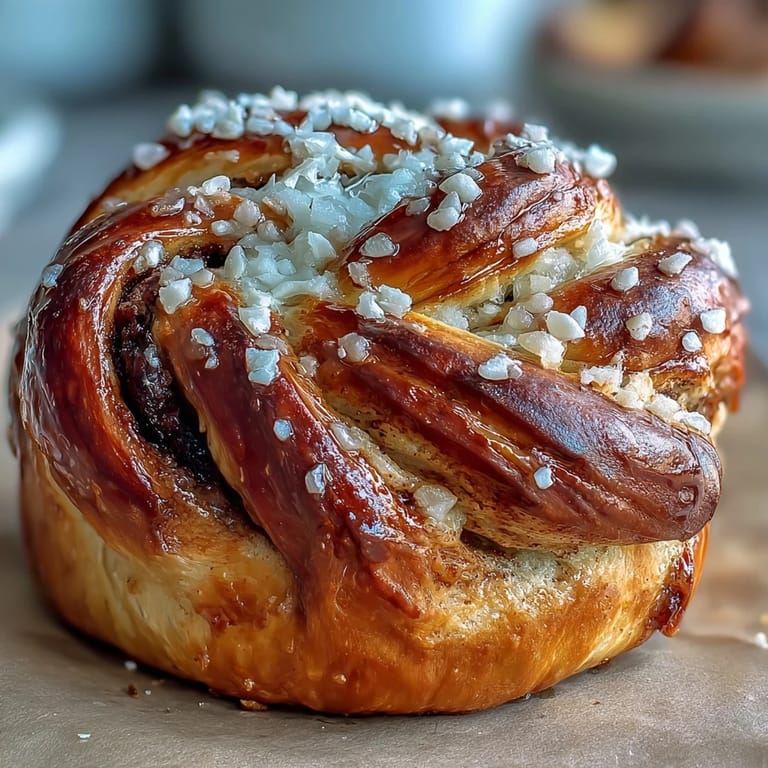
Save Cracking open a jar of cardamom always brings a burst of citrusy warmth to my kitchen, but I never expected how much its aroma would linger in the air hours after baking these Swedish Cardamom Buns. The first time I twisted dough into knots, I hesitated, unsure if my sticky fingers would manage anything close to those perfectly plump buns at the bakery. Instead, they came out a little lopsided and charmingly rustic—a proud sign I’d baked them myself. That sweet smell mingled with melting butter and sugar, turning a dull Sunday into one of those quietly wonderful afternoons. The gentle crunch of pearl sugar on top still reminds me how baking can be both a comfort and a small adventure.
My cardamom buns first made a full kitchen appearance when an impromptu fika was requested by friends braving a chilly spring morning. We crowded around the oven, joking about whose bun would rise the fluffiest, laughter competing with the patter of rain on the window. No one waited for them to fully cool; hands reached in for still-steaming pastries, and the batch vanished in minutes. I barely managed to save one for myself, coffee in hand. That day, flour-dusted countertops felt like the coziest place in the world.
Ingredients
- All-purpose flour: A sturdy but tender base—sifting it helps keep the dough fluffy and light, which I discovered after my first batch turned just a tad dense.
- Granulated sugar: Sweetens the dough and wakes up the yeast, helping everything puff so invitingly while baking.
- Active dry yeast: Using a fresh packet makes all the difference in ensuring a lively, enthusiastic rise, so I always check the date.
- Salt: Just enough to balance the sweetness and pull out the warmth of cardamom.
- Ground cardamom: The heart of the bun—freshly crushed seeds turn the flavor from pleasant to unforgettable, so I use a mortar and pestle when I can.
- Whole milk: Needs to be lukewarm—not hot—to nudge the yeast awake without scaring it off; I microwave it for quick precision.
- Unsalted butter: Softened butter blends smoothly, creating the plush texture that makes these buns seriously irresistible.
- Large egg: Binds everything together; I let it come to room temperature so the dough forms evenly and the rise stays happy.
- Light brown sugar: Rich, caramel notes for the filling, and using it is a tiny trick that deepens every bite beyond plain sweetness.
- Pearl sugar: The crowning touch for crunch and sparkle—don’t skip it, or you’ll miss out on that joyful Scandinavian finish.
Tired of Takeout? 🥡
Get 10 meals you can make faster than delivery arrives. Seriously.
One email. No spam. Unsubscribe anytime.
Instructions
- Mix Up the Dough:
- Gather your mixer or a sturdy spoon, and combine flour, sugar, yeast, salt, and cardamom in the bowl. Pour in the lukewarm milk, softened butter, and egg; as the mixer turns, the dough will transform from shaggy to coherent and smooth—after about 8–10 minutes, it should gently spring back if you poke it.
- First Rise:
- Drape a damp towel over the bowl and set it somewhere warm—the dough will puff up and double, a test of patience that’s well-rewarded after 1 to 1½ hours.
- Make the Filling:
- Cream together the softened butter, brown sugar, and ground cardamom until you get a golden, aromatic paste; I always sneak a taste at this stage.
- Shape and Fill:
- Tip the risen dough onto a floured countertop and roll it into a large rectangle—don’t worry if the edges aren’t perfect. Spread the cardamom filling evenly, aiming for every corner, then fold the dough in thirds like a proper letter and gently reroll to smooth it out.
- Slice and Twist:
- With a sharp knife or pizza cutter, slice the dough crosswise into 12 strips. Twist each strip a few times and coil into a knotted bun, tucking the end underneath—some will look tidier than others, and that’s half the charm.
- Proof Again:
- Set the shaped buns on a parchment-lined sheet, leaving room for them to expand. Loosely cover, let rise for 30–45 minutes, and if the kitchen’s chilly I sometimes set the tray near the stove to encourage extra puffiness.
- Egg Wash and Sugar:
- Brush each bun lovingly with beaten egg for shine, then scatter pearl sugar for crunch and sparkle—it always feels like decorating a batch of jewels.
- Bake and Cool:
- Bake at 400°F until golden brown, about 15–20 minutes. Let the buns cool on a wire rack, even if it’s hard to resist tearing in while they’re still warm.
 Save
Save  Save
Save Sometime after making these for a neighbor's birthday brunch, a little girl shyly asked if she could take one home for her grandma. That moment made me realize baking can knit together friendships just as surely as it satisfies a sweet tooth.
Twisting, Shaping, and Embracing Imperfection
I used to fuss over every twist and knot, but after a while, I realized that the quirks in shape and size make these buns all the more inviting. The loops catch extra filling, and the odd shapes look beautiful once they puff and brown in the oven. Making each bun unique turns the batch into an edible mosaic, proof that perfect isn’t necessary for something to be wonderful.
Making Buns Ahead or Freezing
If you want fresh buns in the morning, shape them the night before and let them proof in the fridge overnight, covered. This slow rise deepens flavors and means less rushing the next day. Baked buns also freeze well—just cool completely, wrap tightly, and reheat gently to restore the just-baked softness.
Fika Rituals and Serving Suggestions
In Sweden, these buns are a fika staple, and sharing them with friends over coffee always feels like a small celebration. I love setting out a plate with hot coffee, letting everyone pick their favorite twist.
- Serve with a dollop of whipped cream or a slab of cold butter if you want to gild the lily.
- If you don’t have pearl sugar, crushed sugar cubes work nicely as a stand-in.
- Remember, fresh out of the oven is always best, but toasted leftovers are a treat the next day.
 Save
Save  Save
Save There’s always a little thrill seeing these buns cool on the rack, golden and glistening. Hopefully you’ll find, as I have, that the process is just as delightful as the eating.
Recipe FAQs
- → How do I keep the buns soft after baking?
Cool completely, then store in an airtight container at room temperature for up to two days. To revive, warm briefly in a low oven or microwave wrapped in a damp paper towel. For longer storage, freeze cooled buns individually and thaw at room temperature before warming.
- → Can I use instant yeast instead of active dry yeast?
Yes. Use the same weight of instant yeast and mix it directly into the dry ingredients. You may see slightly faster rise times, so monitor the dough and proceed when it has doubled rather than strictly following clock times.
- → Should I use pre-ground cardamom or fresh seeds?
Freshly ground cardamom seeds yield a brighter, more floral flavor. Split pods and grind the seeds in a mortar or spice mill. If using pre-ground, taste and adjust quantity—freshly ground is more aromatic.
- → Why did my buns turn out dense?
Density often comes from under-kneading, not enough rise time, or overly cold ingredients. Knead until the dough is smooth and elastic, keep it in a warm draft-free spot to double, and ensure the milk is lukewarm to activate the yeast properly.
- → Can I substitute part of the flour with whole wheat?
You can replace up to 25% of the all-purpose flour with whole wheat for a nuttier texture; increase hydration slightly and expect a firmer crumb. Longer kneading helps develop gluten when using whole grain flours.
- → How can I tell when the buns are fully baked?
The tops should be deep golden and the bottoms set and slightly browned. Buns will sound hollow when tapped on the bottom and feel light. Bake until color is even and the interior is springy to the touch.